Wednesday, August 31, 2016

Prepping Cabinets Day 1


I started priming the base of the china cabinet first with the primer and stain blocker.


I like the detail on the bottom panel, can't wait to see it in white.


Then the top piece got primer next.

I was able to remove the glass from the doors for painting but the panes on either side wouldn't come out.  This was a challenge to paint.  I was able to get the glass slightly loose, then I slipped a piece of paper between the glass and my paint brush.    That made it possible to paint each side without getting paint on the glass.


These are the two side pieces I bought to complete my storage units.  All three pieces are going to be painted with a satin finish white paint.  That way since the woods are different all three pieces will look good together.


The door on the right hand cabinet was broken when we purchased it, in 3 pieces.

Before priming I glued and filled the pieces together then reinstalled the door panel into the cabinet.

Luckily these cabinets are made so that the bottom panels are removable which made it easier to repair.

The next thing I did was to remove the glass from these doors, and the priming began.


Happy Decorating!


Tuesday, August 30, 2016

Three Cabinets Get Makeover


I have been priming and painting cabinets for 3 days.

I have hardly stopped to eat.  Worked morning til dark.  They are on my patio and I can feel the weather changing.  Must get them inside before the rains or dew begin.

I couldn't believe that the main china cabinet took 2 coats of primer and 3 coats of paint. The wood was so dry it just drank in the paint. This was way more work then I bargained for but I believe in the end it will all be worth it to have a beautiful new home for my things.  Plus the cost has been under $150.00 for all 3 cabinets.

Tomorrow I will make room inside for all 3, then reinstall all the glass shelves, cleaned and polished and also the door glass on all the doors.

I ordered new knobs so all 3 cabinets will match and some dental moulding for the 2 smaller cabinets, then all will have similar mouldings.

The knobs arrived today and they are perfect. Can't wait to get them inside and installed.

Then begins the long job of unpacking all my glassware and dishes, sorting through the items I am keeping, then washing and placing everything that stays in their new homes.

Today I counted the shelf supports and of course there are some missing. I quickly ordered new ones  that should arrive in a couple of days.  Thank goodness for Amazon.  Otherwise I have no idea where I would have found supports to fit these cabinets.  Seems they carry every size and I believe I found the right size to order.

The larger china cabinet has 2 working lights with bulbs.  The two smaller cabinets are missing their bulbs. I added 2 LED light bulbs, on the same Amazon order.

There are six shelves left to prime and paint.  That will be the I end of the painting.  Thankfully, because somehow I managed to get myself in the sun and ended up a bit red.  Thought I was in the shade most of the days, but guess not.  For us we have been having high humidity.  Yesterday was up to 50%.  So humid I guess I didn't even feel the sun on me.

Check back tomorrow as I will have pictures of the progress so far.

Happy Decorating!

Saturday, August 27, 2016

Week in Review


Monday

Large Magazine Rack Redo


Tuesday

Eyesore in the kitchen Fixed


Wednesday

Love My New Refrigerator


Thursday

Painted  Wooden Cart


Friday


Altered Tin Cans


Happy Weekend!

Friday, August 26, 2016

Altered Tin Cans


I have saved several empty tin cans so I decided to alter 3 of them.

I started with just a plain tin can.  Some bling by the yard, burlap ribbon, handmade flowers and chalk paint.


The first thing I did, after removing the label and washing and drying ,was paint the cans white. 

Then when they where dry I used my hot glue gun to glue on the burlap ribbon, bling and flowers.

 That's it.  A Simple fast project with a big wow.

These are great for flowers or holding pens or art brushes on the desk.  Or on the vanity for holding makeup brushes.  Lot of uses and so little cost to make these pretty containers.


Now that I have the easy project out of the way I will begin a huge project next week.

We went to the Habitat for Humanity Restore in our area and I found 3 pieces of furniture I plan to paint and use to store my dish and glass collection.  That is the same collection I had to pack in boxes to clear the way for the new refrigerator. So this is the perfect time to buy new cabinets while everything is in boxes.  I can wash them all and put them in a nice new  to me cabinets  Plus it will be so nice to have a place to have things where they are easy to see and easy to use.

The first one is a china hutch plus two tall cabinets.  I think I will put one on each side of the china cabinet.

It took us 4 trips to the Restore to pick up all the pieces of furniture.  Two cabinets and the 2 piece china hutch.  Good thing we don't live that far away. 

On the way home I stopped at the big box store to buy primer and paint.

I love to collect dishes and glassware.  But really haven't had a good place to store my collection.  I have had them stored on shelves.  Not very practical and they were not safe from my cat or Mr. K.

So I hope what I have in mind will look as good as I am imaging.  And also these will keep everything safe in cabinets behind glass.

All 3 cabinets have light fixtures and china hutch has glass shelves to help show my collection. Now I need to figure out what size lights each cabinets requires.

I am sure this new project will take several days to complete.  Stay tuned for pictures next week.

Happy Crafting!


Thursday, August 25, 2016

Painted Wooden Cart


Oops!  I forgot to take a picture before I started staining the top of the cart.

This handy little cart has been passed around the family since I put it together in the 1980's.

It was just time to give it a fresh new look.

I used a dark gel stain to color the top of the cart.


The bottom I painted white to match the kitchen.


After the cart was dry I decided to use it to hold the dishes we use fro everyday meals.
I hung the matching cups from a rack above and ordered bronze colored stands to hold the dishes.

I then needed to relocate the phone higher up on the wall  to make room for the dishes.


You can see my framed gold ribbon in the picture frame I won for best desert at an event I entered when I was working as a pastry chef many years ago.  Finally managed to get that framed.


I also change the knob from the original wooden one to a bronze colored one to match the rest of the kitchen knobs. Then I hung the wooden rack above the cart that dispenses the foil and paper towels, etc.  I think I will take that down and paint it white, also.  First I need to go to the store to buy more paint.

This makes a nice little command center for everyday dishes and storing items that are used often.


Happy Decorating!


Wednesday, August 24, 2016

Love My New Refrigerator


Well, it finally arrived on Saturday.  I can't believe how nice it really is.  I bought black to match my black and white kitchen.  All my appliances are black.  Next I plan to have installed a black slate colored countertop in the kitchen.


It is almost 30 cubic feet.  Plenty of room for everything and a place for everything.  I love organization. So I bought refrigerator storage boxes to fit the shelves.  Makes taking things out and keeping them organized so easy.

The vegetable bins are gigantic and have totally separate moisture controls to keep vegetables fresh.

I even have a shelf I am not using.  On the bottom right side the shelf slides back for when you need to store something tall like the Yogurt container.


We find that having the separate deli drawer means we don't need to open the main frig. as often and I am sure that helps save a lot of energy.  So the items we use the most I put in the deli drawer.


Also love the fact that the deli drawer also has separate controls for setting the temperature depending on what you are using it to store.


The doors are also very deep and will hold gallon containers.  And the light.  There are lights everywhere, deli drawers, produce drawers, freezer and main compartment.  Totally bright with no dark corners.


I was totally amazed at the the size of the freezer. The bottom drawer is deep enough to easily hold a couple of large turkeys and I am keeping all my frozen fruits in the top drawer for smoothies.  And then there is the small shelf that runs inside the freezer drawer, great for keeping small items handy and out of the main compartment where they could get lost.

Now that I see just how deep the freezer actually is I will have to buy a few good sized freezer baskets to organize that area, too.

Wow, this thing is fantastic and I got over 55% off the normal price.  I had been looking for one like this for several years.  Just never realized how wonderful to would be.  Amazing I can get so excited over a refrigerator.


Happy Shopping!


Tuesday, August 23, 2016

Eyesore in the kitchen Fixed


The telephone cords for the house come in through the kitchen wall about 5 feet from the floor.  I had forgotten they where there until I move a shelf.

It is really an eyesore now that the shelf is moved.  I was trying to figure out what I could do to conceal it.


Then I remembered I had an empty picture frame that was long and skinny, 
about 6 inches by 18 inches.

I pulled some larger pieces of balsa wood out of my stash and cut them to fit the frame.  


Next I hot glued them to the frame and stenciled a few places to add texture using a bubble wrap image stencil.


In order to raise the frame off the wall so the cords can run behind it I glued the cut off pieces of balsa wood to the sides and added clips to each side piece.


When the stencil was dry I painted the entire piece white with chalk paint.  Then I distressed all the edges of the boards and frame.

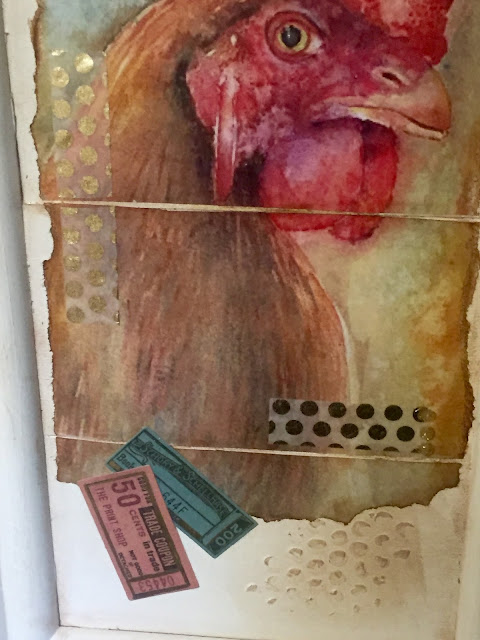
I next printed out a picture of a rooster.  


Then I cut the picture into 5 pieces.


The rooster is cut to fit the size of the boards.


After all the pieces where torn I used distress ink on all the edges and used Mod Podge to glue all the pieces in place.  I added a few pieces of gold polka dot washi tape, gold liquid pearls and a few gold ink accents.  I also added a few ephemera pieces.


On the 5th piece of paper I stamped "NOTES" in aqua before gluing it to the board and also more ephemera pieces.


I can't get rid of the wires and connections but I was able to make them a little less noticeable.


Happy Crafting!


Monday, August 22, 2016

Large Magazine Rack Redo


I didn't have a ton of time to work on projects last week.  I cleared a path for our refrigerator to be brought in by the front door, down our long hallway, only to realize it wouldn't make the turn into the kitchen.  That meant that I had to clear a path from the back door.  Not such an easy task since there was a china cabinet in the way.  So I proceeded to remove, wrap and box all my china and glassware.  Move the cabinet and make room for the refrigerator to come through.  Now I need to unpack, wash and replace everything.  It will be so nice to get my house back in shape.

One project I did get done was to redo this large wooden magazine rack I found at a vintage sale a couple of weeks ago.  It appears to be handmade by the way it is put together.


I decided to paint it pink with an off white interior.  Here you can see the inside painted white.


And the outside pink.


I separated the top layer from printed napkins with roses and tore the roses from the napkin.


Using Mod Podge I adhered the napkins to the ends and sides of the dried painted wooden magazine rack.


Using the leftover pieces of the checkered background of the napkins I glued those randomly to the handle at the top.

Not sure how or where I want to use this piece.  It is very large.  I could get 2 rows of magazines in it side by side.


Happy Crafting!


Saturday, August 20, 2016

Week in Review


Monday

Hanging Rack Makeover


Wednesday

Ikea Flowerpot to Hanging Light Conversion


Thursday 

Bird of  Paradise Redo


Friday

Upcycled Christmas Tag Box


Happy Weekend!


Friday, August 19, 2016

Upcycled Christmas Tag Box


If you saw last week's post about my Christmas Journal then you know I used Christmas tags on the pages and had one leftover.

I decided to make a small vignette ornament out of the leftover box the tags came in and use the one remaining tag.

This box was just too cute to toss away.


The first thing I did was to cover the inside of the box with red polka dot paper.  Then I attached the one remaining tag to the box by glueing several small pieces of foam core board cut smaller than the tag and stacked to lift the tag off the back of the box.


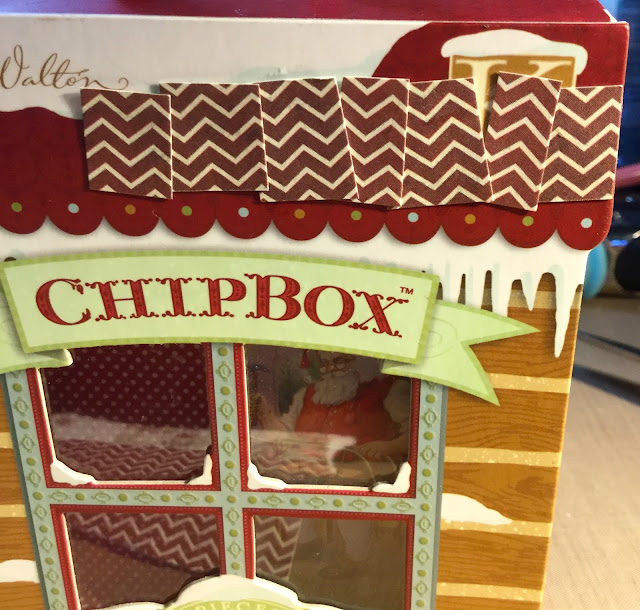
I positioned Santa so he would show through the window on the frond of the box.


I cut the fireplace and Christmas tree to fit in the background and added a piece of Christmas greenery at the bottom.


Next I placed a battery operated tea light in the upper right corner to light the interior of the box.


Then I cut not quite square pieces of paper to form shingles for the roof of the box and glued them in place at the top front of the box in 2 rows.


I cut a Christmas sign from paper and glued that above the window,  and some holly below the window.  For the snow I used some white dimensional paint and sprinkled a combination of clear tinsel style glitter and some fairy dust glitter.  Then highlighted the holly and berries with red and green Stickles.


The back side I covered with large polka dot paper glued on a gold wreath from my stash then another Santa.


Here you can see the tea light lighting the interior of the box.  The box came with a ribbon on the top so this ornament can also be hung.


And here is how it will look on a shelf lit and ready for Christmas.


Happy Crafting!