Thursday, September 28, 2017

Trip to Old Hangtown, CA


I know that is a strange name for a town.  These days the town I grew up in is called Placerville but back in the 1800's it was called Hangtown.

They held swift justice for gold claim jumpers and murderers.  It is said only 3 people where hung from a tree where today stands an ice cream parlor.

The current owners spent many months restoring the beauty to this building.  When I was a kid it was a saloon.  Oh don't you love the wild west.

Here is a little of the wild west the has been saved for future generations.


drawing of Hank Monk famous stage coach driver.


Complete with tin ceilings.


They were able to save a mural that had hung on the wall for many a year of the towns beginnings.


Giant gold pan display


Here it looks like they electrified old railroad lanterns.


And there are tons of old photos and artifacts on the walls.  Everyone from Mark Twain to Horace Greeley and President Grant made their way through here in the early days.  There is even an unmarked grave where Billy the Kid's father was laid to rest.


Here is an early parade.


Mark Twain

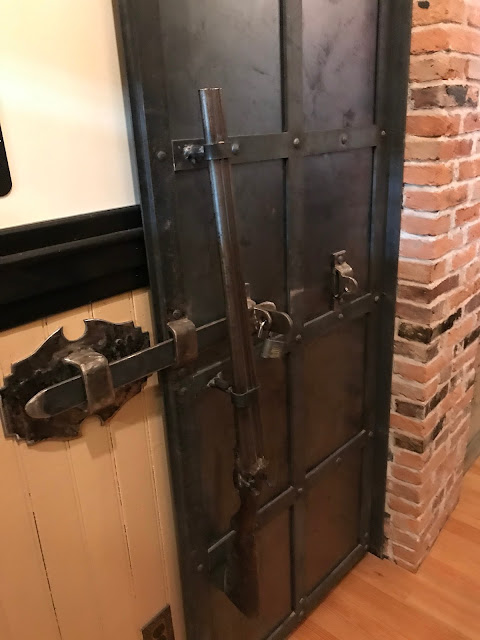
Love the shot gun door handles.


You might also recognize some of the houses from town.  Many were used in Thomas Kindade''s paintings.


This one I have hanging in my living room.  I lived in this house in high school. The little diamond shaped window was my bedroom.  


He also did a painting of the bakery I owned downtown.  Nice to have those memories hanging on my walls.

So, there is a little of the history of our little town.


my bakery in the center


Happy Travels!

Monday, September 25, 2017

Little Pink Crown


Here I collected a variety of items to create a shabby chic crown.

A wooden die cut, metal filigree piece, some bling and a piece of metal trim.


I began by forming the metal trim into a circle about 4" in diameter and held it in place with a clip until it dried.


For the little piece of filigree I simply gave it a slight curve to match the bend of the metal.


I know, now of these items match.  But it really doesn't matter because when it is all put together I will paint the pieces to match.

Here I used a piece of wide ribbon to glue to the back of the  die cut and cut holes in the open areas for later bling.


Then it was time to assemble the crown  by gluing all the pieces together.  Once the glue was dry I gave the entire crown a coat of pink chalk paint.


Then I glued a rhinestone into each open area.


Next I sanded the metal to distress it and glued the long piece of bling around the bottom of the metal edge.


Once it was completed all the different elements blended into each other forming the little pink crown.


Here I placed it on a female bust in a small vignette. You can see a silver shaker in the foreground I turned into a picture or memo holder.  I love it when I find a single shaker in the vintage stores.  There are so many things you can make out of them.  Like this holder or a tassel to hang from a knob, for example.

I am sure this little crown will find it's way to other areas around the house as the seasons change.


Happy Crafting!


Thursday, September 21, 2017

Pretty Little Cabinet Refinished x 2


I found this little cabinet in a resale store.  It was dated and in pretty rough shape.

The first thing I needed to do was to glue the entire cabinet back together.


I decided I wanted to eliminate most of the hearts.  In order to hide the hearts I cut pieces of chipboard to cover first the top decorative piece and glued that in place.  I sanded the edges to smooth and contour with the wood.


Next I did the same thing with the door panels.  I also replaced the wooden knob with a sparkly glass knob.


I had this pretty glittery piece of scrapbook paper that I cut to fit over all the chipboard.


Next I painted the entire piece with an off white chalk paint.


Then glued and sealed the scrapbook paper to cover all the chipboard.  At this point the cabinet was finished and ready to hold small items in the half bath.

But it just looked dingy to me.

Although it looked nice it just wasn't for me.  So I set it aside until I could decided how to make it a better match to my decor.  If you have read any of my posts you can see I like items that are more of a bright white.  However, the paper I had chosen was such a good match.


Then it hit me.  I took some of the bright white chalk paint and using a paper towel I smudged a little of the white paint over the lightest area of the paper to lighten it up enough so I could paint the whole cabinet bright white.  When the paint was dry I lightly distressed the edges of the cabinet with a fine grit sandpaper.


Before

That did it, now she is ready to stand in the half bath to hold extra bars of soap and other small items.


after

Happy Decorating!


Monday, September 18, 2017

Tabletop Vintage Chair Makeover


I spotted this cute little chair and bottle at a vintage market.  I thought the chair would make a cute tabletop candle holder.

It has some damage that appears be animal tooth marks.  Time to paint and disguise the damage.


I chose to use aqua and white.  I painted the spindles on the chair and the cross brace on the bottom aqua and the rest of the chair white.


Using a pretty napkin I cut out a bird and a few flowers to decoupage on the seat and the damaged areas.  


 Using Mod Podge I applied the bird and flowers. Then sealed them with more Mod Podge.


And here I have this little chair with a pretty candle in the seat.


On the little bottle I wrapped the neck with some wired twine and added a little metal medallion.  Just below the top I hot glued on a green leaf trim.

This little bottle is so cute only about 3 inches high.  I placed it on a shelf next to my tiny little 1 inch box.  I have always liked miniatures.  Ever since I was a teenager I have collected miniature books.  Have collected quite a few of theses little books over the years.


Happy Crafting!


Thursday, September 14, 2017

Metal Ivy Heart Wreath Quick Makeover


I bought this green metal wreath many years ago.  Back in the 90's It was a good look.  But lately it has been stored in the garage.  It was just too green for my decor now.  I always liked the shape but not the color anymore.


I gave this a very quick makeover by just painting the leaves bright white.


I left the stems green to show depth of the wreath.


Here I have it hung on our front door as a late summer wreath.


Happy Crafting!