Friday, September 30, 2016

Vintage Labeled Bottles


I thought I would try a technique I have seen on Pinterest many times using packing tape to transfer images to glass.

I have been saving a few glass bottles and containers to alter.  For this project I choose 3 of different sizes and shapes.


First thing I did was go to Graphics Fairy and printed a few vintage labels in black and white on my laser printer.


I choose tree of them to work with and cut them out close to the images.


Next I cut packing tape to lay over each image and again cut them close to the images.

After the tape was in place I rubbed them to make sure all the air bubbles where out.

Once they where all prepared I placed them in a bowl of hot water for a few minutes.


When these soaked for a few minutes I turned them over and carefully rubbed all the white paper off the back of the tape.

Here they are sticky side up and all the paper rubbed off the tape.


Using a hair dryer on low fan I gently dried each label.  Drying with the blow dryer helps to make the tape sticky again so they will stick to the glass.

Be careful not to get them too hot causing them to burn or curl.


Next I applied one label to each jar making sure not to leave any air bubbles.  Rub across the  entire labels to make sure they are adhered to the glass completely.


That's it, that's all.  The trio is ready to hold bath salts, spices or flowers.

Remember these are not water proof, but you can clean them with a damp cloth.


Happy Crafting!


Thursday, September 29, 2016

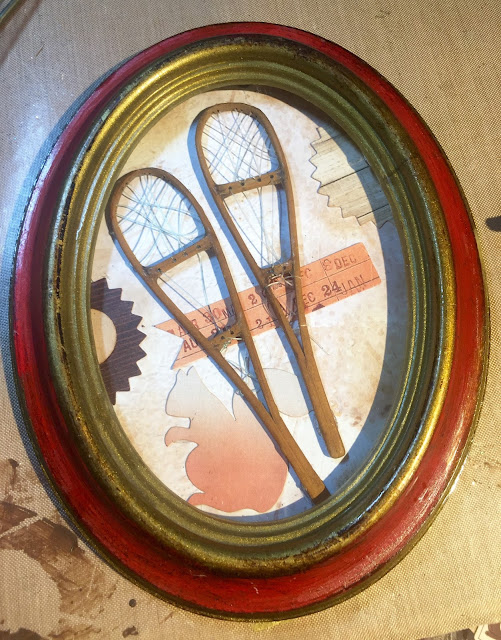
Tiny 3" Snowshoes


My Step-Dad was a wonderful wood worker.  He made beautiful furniture and accessories from wood.

But these tiny snowshoes were something he also made. I never knew why he made these but they are so cute.  

 One was strung with filament but he never got around to stringing the second one.


So, today I finished stringing the second snowshoe. 


Then I decided they should be displayed.

I found a cute little oval frame in my stash and framed the tiny snowshoes.


I cut a piece of patterned paper to fit the back of the frame and glued it to the cardboard backing then added a few pieces of ephemera in the background after attaching the snowshoes.


Here you can see the frame with everything attached and ready to finish.


I added a couple of paper Prima flowers and made two green velvet leaves I cut from velvet ribbon.

I plan to hang this by my staircase where I have a collection of family pictures and keepsakes.


Happy Crafting!


Wednesday, September 28, 2016

Mom's Lazy Susan Gets New Paint


I came across this Lazy Susan that had been my Mother's while sorting through boxes of her stuff.

I thought it might be nice to use on our dining table, however, I didn't like the old faux wood grain with it's chips and scratches.


Last time I was at one of the big box hardware stores I found this container of "oops" paint that I thought was a lovely color and it only cost $1.25.  SOLD.


It was the perfect color choice for my Lazy Susan which took 2 coats to cover nicely.


first coat of paint

I was not terribly excited with the brush marks. So on the second coat I used my brush to make the brush marks spiral to the center.  That looked much better than random strokes since there where was no grain to follow.


Next using Paris Grey Chalk Paint I stenciled a random design of bubbles and hot air balloons.


And here it is all finish and on the table.


Happy Crafting!


Tuesday, September 27, 2016

Three Ltitle Rusty Lanterns


Many years ago I bought three little lanterns about 5" tall.  Their glass sides were red, yellow and blue.  I used them in the garden with tea lights for awhile.  After a few years they where forgotten and were stored away.  By then they where peeling paint and rusty.

But this morning on the internet I saw a lantern very much like mine painted pretty aqua color with clear glass.

Hmmm, did I still have my little sad lanterns.  Yep, I found them and decided to give them a makeover.

 I have already removed the red glass from the lantern on the left in the picture below.  I put the pieces of glass in a bowl of hot soapy water to see if I could soak the color off the glass.  After about an hour the color came off with a light scrubbing using a green scrubby.


Next I soaked off the blue color and lastly the yellow.


While the glass was soaking I scraped all the loose paint and rust from the lanterns.


Then I started painting the lantern tops and bottoms.


First one completed with glass reinstalled.


Now I have 3 refreshed little aqua lanterns ready for new candles.  I think I will use battery operated  tea light candles so these can be used in table arrangements without the fear of fire.

before


Hard to believe these are the same 3 little rusty lanterns I began with this morning.


Happy Crafting!


SaveSave

Monday, September 26, 2016

Upcycled Tray


Well, I have internet back but still no phone.  We live in area where until just recently one company had exclusive rights to serve our area.  We finally have a chance to change from that one company that doesn't know what costumer service is to another company.  The only problem the guy they sent out didn't know what he was doing.  He told us they would have to dig up our yard and driveway to install the cable.  No WAY!

Called the company back and they are sending someone else out on Monday to check out our problem.  But until then we still don't have a phone because it depends on their installation.

I guess we will still be stuck with the old company if all they want to do is tear up our yard.  So hopping the installation can go through because we are so tired of the company we have now.

Today's project is a brass tray I bought at a second hand store.

It is a nice size however I don't want to spend my life polishing brass. It is pretty tarnished already.


I began by painting the tray white with 2 coats of chalk paint.


one coat

After both coats of paint were dry I used pink chalk paint just on the raised outer edge.


Next using painters tape I adhered a stencil to the center of the tray and using a brush with most of the paint tapped off on a paper towel I added the center medallion.


Now I have a  nice tray with no polishing that I can use for serving or to add under a center piece on the table.


Happy Crafting!


Saturday, September 24, 2016

Week in Review


Monday

Halloween Skull from Dollar Store 


Tuesday

Black Crow Wreath


Wednesday


Rugged Back Country


Thursday

Glittered Dollar Store Wine Glass Pumpkin


Friday

Internet and phone line not working


Happy Weekend!

Thursday, September 22, 2016

Glittered Dollar Store Wine Glass Pumpkin


Today I decided to create a new pair of Fall candle holders.

Awhile back I purchased a pair of plain clear glass wine glasses from the Dollar Store to make a pair of candleholders for Fall.


Here are the supplies I began with, several shades and sizes of orange and green glitter, a fall faux leaf and a piece of twine.


Using my good old do everything Mod Podge I liberally coated the bulb of the glass and began by sprinkling the chunky glitter in a few spots then added the other two colors of fine glitter to cover the entire bulb of the glass.

I like the way the two different kinds of glitter add extra sparkle and texture.


Letting that dry I next did the same for the stem, starting with the chunky green glitter and finishing with the fine glitter to cover the entire stem.


Next using hot glue I attached a faux fall leaf and tied a piece of twine into a bow around the stem.


When dry I placed a candle on top. 

If I was planning to light the candle I would place a glass votive holder before burning the candle and place the candle inside the votive holder.

The pair would look nice on a Fall table or mantel.  Just a little bling for the season.


Happy Crafting!